
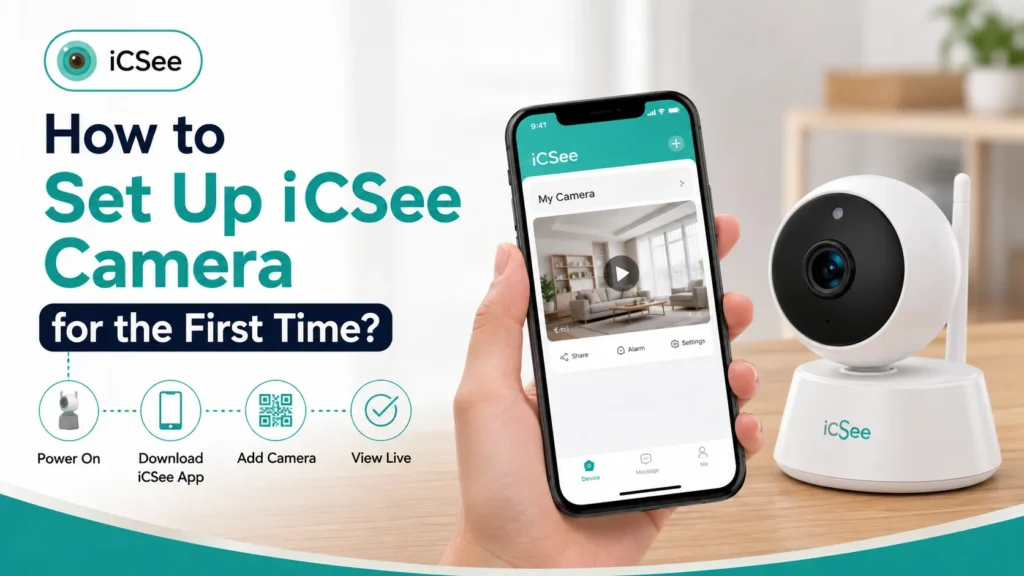

Setting up a new camera should take five minutes. For a lot of people it turns into an hour of the app stuck on “connecting,” a QR code that won’t scan, or a camera that pairs once and then never comes back online. None of that means your camera is broken. It almost always comes down to one small thing: the wrong WiFi band, a VPN quietly blocking the connection, or a step done out of order.
This guide walks through the whole setup, start to finish: pairing over WiFi or AP mode, setting up an NVR or DVR kit if you bought a multi-camera system, where to actually mount the camera so the footage is worth watching, and how many days your footage will last before it gets recorded over. By the end, you’ll know why your setup failed last time — and how to get it right this time.
What You Need Before You Set Up Your iCSee Camera?
Skipping prep is the single biggest reason setups fail. Check these first.
| Requirement | Why it matters |
|---|---|
| iCSee app installed, location permission granted | Android 10+ blocks WiFi scanning without it |
| Router network name and password, written down exactly | Capitalization and special characters matter |
| A 2.4GHz network | Almost every budget iCSee camera can’t see or join 5GHz at all |
| WPA2 security (not WPA3) | Many camera WiFi chips can’t complete a WPA3 handshake |
| Camera powered on for 30–60 seconds before you open the app | Lets it finish booting before it tries to pair |
| A microSD card, Class 10 or higher, formatted in-app | Slower cards drop frames during motion recording |
While you’re unboxing, check that the box has the camera, power adapter, and mounting screws — a missing adapter is easy to miss until you’re halfway through setup. If you’re mounting outdoors, on a porch or garage, use a covered, weatherproof outlet. Plugs left out in the rain are a common reason cameras stop working within the first year.
Step 1: Connect Your iCSee Camera With the QR Code Method
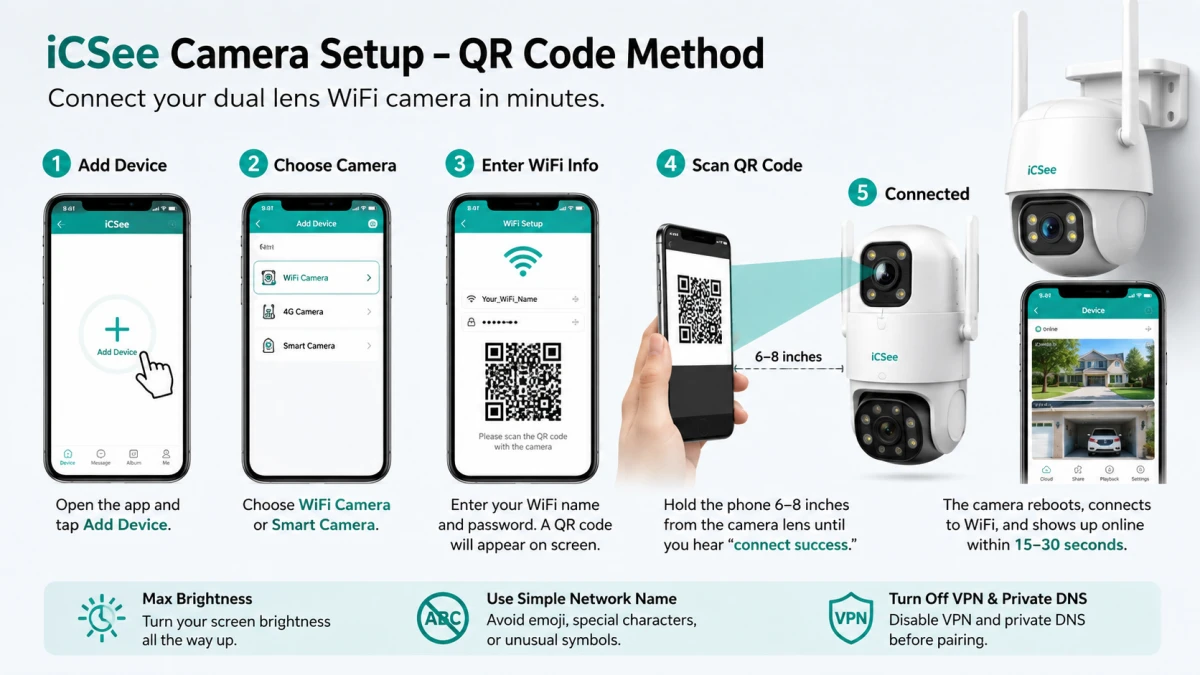
This is the default flow for standalone WiFi cameras.
- Open the app and tap Add Device.
- Choose WiFi Camera or Smart Camera.
- Enter your network name and password. The app builds a QR code on screen.
- Hold the phone about 6–8 inches from the camera lens, steady, until you hear a confirmation tone like “connect success.”
- The camera reboots briefly, rejoins WiFi, and shows up as online within 15–30 seconds.
A few things trip people up here. Turn your screen brightness all the way up by hand — a dim, auto-dimming screen makes a QR code the camera’s low-quality sensor can’t read well. Network names with emoji, accented letters, or unusual symbols can also break the QR code even though it still looks fine on your screen; renaming the network to plain letters and numbers avoids this problem completely. And if you have a VPN or a private DNS turned on, turn both off before pairing. This trips up remote workers all the time, since either one can quietly block the connection between phone and camera with no clear error message.
Step 2: AP Mode for Your iCSee Camera (When QR Scanning Won’t Cooperate)
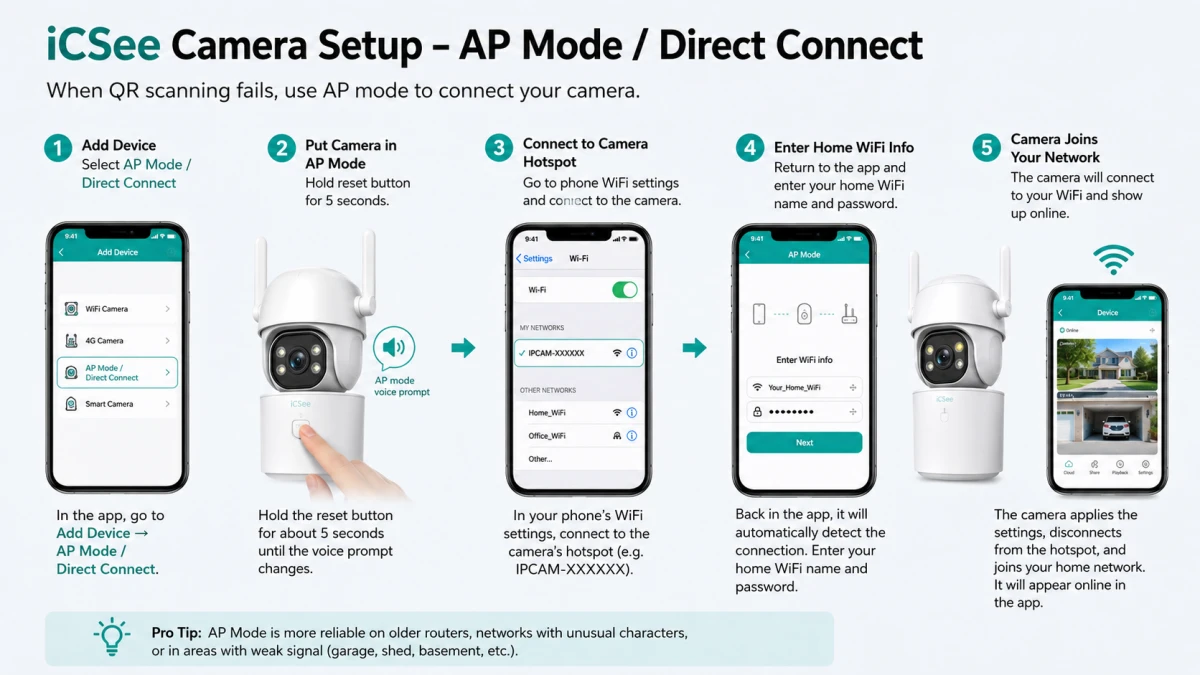
If QR scanning fails three or four times in a row with no change, stop retrying and switch to AP mode. Instead of the icsee camera reading a code off your screen, your phone connects directly to a temporary hotspot the camera broadcasts itself.
- In the app, go to Add Device → AP Mode / Direct Connect.
- Put the camera into AP mode — usually by holding its reset button for 5 seconds until the voice prompt changes, or by triggering it remotely from the app.
- In your phone’s WiFi settings, connect to the camera’s own network (something like “IPCAM-XXXXXX”).
- Return to the app, which detects the direct connection and asks for your home network’s name and password.
- The camera takes your network info, drops its hotspot, and joins your home network.
AP mode takes longer but tends to be more reliable on older routers, networks with unusual characters, or spots where signal is already weak. If you’re setting up a camera in a garage, shed, or basement corner, it’s worth starting with AP mode rather than burning time on QR attempts that fail because of weak signal, not a bad scan.
Where to Mount Your iCSee Camera for the Best Coverage?
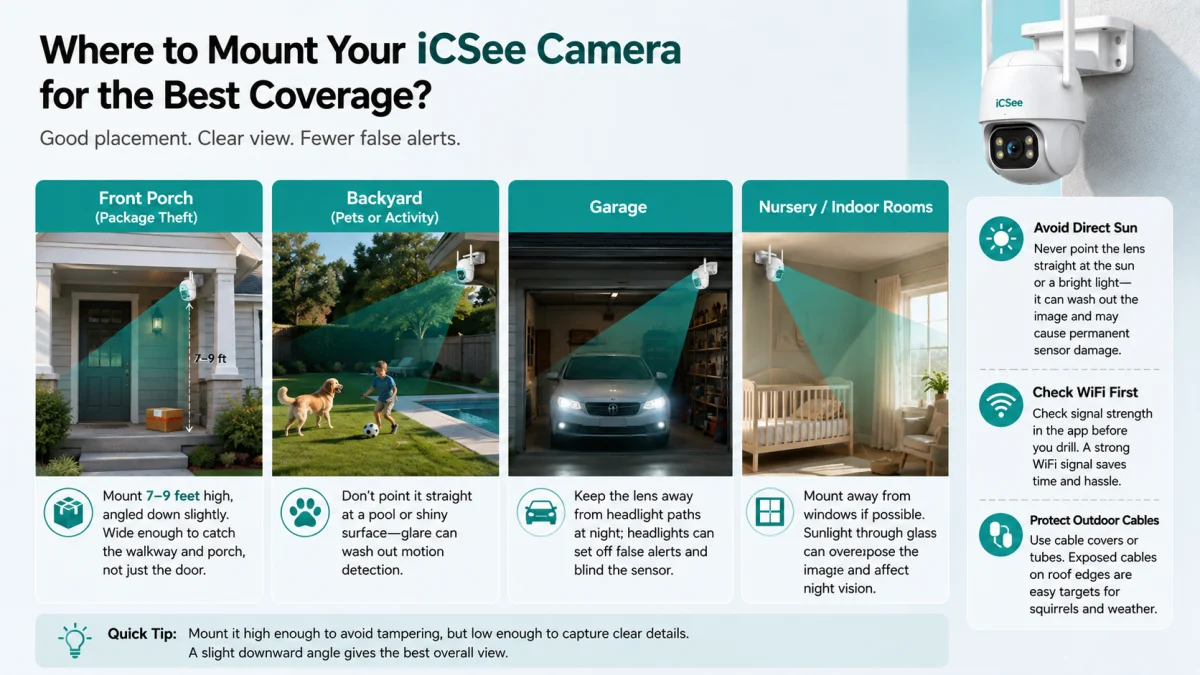
Pairing is only half the job — where you mount the camera decides how useful the footage is. A few simple tips for common setups:
- Front porch (package theft): mount it 7–9 feet high, angled down a little, wide enough to catch the walkway and the porch, not just the door.
- Backyard (pets or activity): don’t point it straight at a pool or shiny surface — glare can wash out motion detection in bright afternoon light.
- Garage: keep the lens away from headlight paths at night; headlights can set off false alerts and briefly blind the sensor.
- Nursery or indoor rooms: mount away from windows if you can. Sunlight through glass makes the image too bright and can flip night vision on and off at random.
Two things matter more than they seem. First, never point the lens straight at the sun or a bright light for long — it can wash out the image and, on cheaper sensors, leave a permanent bright spot. Second, check your WiFi signal strength in the app before you drill anything into a wall. Mounting a camera and running cable through a wall, only to find the signal is too weak in that exact spot, is a frustrating mistake that’s easy to avoid. If you’re running cable outdoors, protect it with a cover or tube — exposed cable on a roof edge is an easy target for squirrels and bad weather.
Setting Up an iCSee NVR or Multi-Camera System
NVR (Network Video Recorder) kits — the boxed systems with four or eight wired cameras and a central unit — work differently. The cameras themselves usually aren’t WiFi devices; they’re wired to the NVR over Ethernet or coax, so the NVR is the only thing that needs a network connection.
- Connect the NVR to your router with an Ethernet cable — most NVRs have no wireless radio at all.
- Power it on and give it 60–90 seconds to fully boot, longer than a single camera needs.
- In the app, choose Add Device → NVR/DVR.
- Scan the QR code on the NVR’s monitor output, or type in the UID (a serial number on a sticker on the unit).
- Set a device password if prompted — many kits ship with a blank password or “888888” as default, and the app will force a change on first login.
- Once connected, every attached camera channel shows up as its own tile inside a single device entry.
A DVR system (common with older analog cameras) goes through the same steps in the app, even though the video signal behind it is a totally different type of technology. Inside the app, you usually can’t tell an NVR kit from a DVR kit — both just show up as one device with several channels.
iCSee Camera Recording Modes: How Long Your Footage Actually Lasts
Most standalone iCSee cameras record to a microSD card rather than the cloud, since cloud recording on these budget devices is usually either unavailable or a separate paid add-on. Format the card from inside the app — not on a laptop — right after you insert it; the app needs its own file structure to write to it correctly.
The recording mode you pick changes your storage life by a lot, and this is where a lot of people get an unpleasant surprise a few weeks in. Here’s the math for a common setup: H.264 video at 2 Mbps, on a 128GB card.
| Recording mode | Daily storage used | Footage retained |
|---|---|---|
| Continuous, 24/7 | 21.6 GB/day | ~5.9 days |
| Motion-triggered,~3 active hrs/day | 2.64 GB/day | ~48.5 days |
Same card, same camera — 8 times more footage saved. If you want a long history to check “what happened last month,” motion detection isn’t just a battery-saving setting. It’s what decides whether the footage still exists when you actually need it.
Motion sensitivity is worth adjusting once setup is done. Set it too high, and wind-blown trees, shadows, and passing cars will fill your storage with junk clips and flood your phone with alerts. Start with a medium setting, watch a day of alerts, and turn it down if you’re seeing false alarms from moving leaves rather than real movement. This one change often fixes both the storage problem and the too-many-notifications problem people complain about most.
Common iCSee Camera Setup Problems and Fixes
| Problem | Likely cause | Fix |
|---|---|---|
| Shows “offline” after connecting fine at first | Router DHCP lease expired, or camera dropped to a weak channel | Power-cycle the camera; check if the router auto-switched channels |
| QR scans but the app still errors out | Weak signal during the handshake | Move the camera closer to the router temporarily, then relocate after setup |
| Can’t find the camera for local viewing, same network | AP isolation on a guest WiFi network | Connect the camera to your main network, not guest |
| Forgot the device password | No in-app recovery for most models | Hold reset 8–10 seconds to factory reset, then re-add as new |
| 5GHz doesn’t show as an option | Not a bug — most cameras are 2.4GHz-only | Create a separate 2.4GHz-only SSID if your router combines both bands |
| Pairing fails with no clear error | Active VPN or private DNS on your phone | Turn both off before starting the QR or AP setup |
iCSee Camera Cloud (P2P) Access vs. Local Network Access
Once your icsee camera is online, you’re actually viewing it two different ways depending on where you are — and they aren’t equally private. On the same WiFi network as the camera, the app talks to it directly. Away from home, the stream routes through the manufacturer’s relay servers before it reaches your phone.
That difference is worth knowing even if it rarely changes what you do. Local viewing stays entirely inside your own network. Remote viewing, even if encrypted, passes through outside servers you can’t check yourself. For most households that trade-off is a fair price for convenience — but it’s better to know it’s happening than to assume the app works the same way everywhere.
Is the iCSee Camera Safe to Use?
Security researchers have found real problems with generic P2P camera platforms like iCSee: weak default passwords, and cases where an outsider can guess or find a camera’s UID and connect to it if the owner never changed the factory password. This isn’t a one-time problem — it’s a known risk across many white-label camera apps, and it’s worth taking seriously.
A few steps that really cut down that risk:
- Change the default device password the first time you log in — not “later.”
- Keep firmware updated through the app’s settings menu; that’s how manufacturers patch known holes.
- Don’t share your UID or QR code image publicly, including in resale listings or forum posts — the UID alone is sometimes enough to attempt a connection.
- For cameras in especially sensitive spots, turn off remote/cloud access and stick to local viewing only.
None of this makes the app unusable for a normal home setup. It just means the password screen is a required step, not an optional one — which is exactly where most first-time setups go wrong.
iCSee Camera: Frequently Asked Questions
Why won’t my icsee camera connect even though I entered the right password?
It’s usually the wrong WiFi band, not a typo. If your router broadcasts 2.4GHz and 5GHz under the same name, the camera may try to join the 5GHz side and fail with no clear error. Split the bands into two separate names for setup, connect to the 2.4GHz one, then merge them back after if you’d like.
Can more than one person view the same camera?
Yes, through account sharing rather than sharing a login. The main account can create a share invite from device settings — usually a QR code or link — which a second phone scans to get viewing access without the original password. You can set what that second person is allowed to control.
How do I adjust motion detection sensitivity?
In the app, go to Device Settings → Motion Detection and lower the slider if you’re getting false alerts from wind, trees, or passing headlights. Start medium and adjust after watching a day’s worth of triggers.
Does iCSee support two-way audio on every camera?
Only on models with a built-in mic and speaker — that’s a hardware limit, not an app one. A greyed-out talk icon in live view means the camera itself lacks that hardware.
How do I add a second icsee camera to an existing account?
Repeat the same Add Device steps from the main device list. The app doesn’t limit how many cameras one account can manage, though a lot of tiles can slow down the live-view screen on older phones.
Is there a cost to use the iCSee app?
The app and basic local/remote viewing are free. Cloud recording, where a manufacturer offers it, is a separate paid subscription — since iCSee is a shared platform across many camera brands, not one company’s product.