


You open the iCSee app, tap on your camera, and instead of a live feed you get a spinning wheel, a black screen, or that dreaded “no video” message. Maybe it happened right after a storm knocked out your power. Maybe it just started one random Tuesday with no warning at all.
Either way, a blank screen where your camera feed should be is unsettling, especially if that camera is watching your front door, your garage, or your kid’s playroom. This guide walks through the actual reasons an iCSee camera loses video, in the order you should check them, so you’re not guessing or restarting things at random. By the end, you’ll know how to tell a simple Wi-Fi hiccup apart from a dying camera, and what to do about each one.
Why Does My iCSee Camera Show No Video?
Most of the time, an iCSee camera loses video because it can’t reach the network reliably, not because the hardware is broken. The camera itself is usually still recording locally or trying to connect; it’s the connection between camera, router, and app that’s breaking down somewhere.
There are really only a handful of root causes behind this, and they tend to overlap:
| Cause | How Common | Typical Symptom |
|---|---|---|
| Weak or dropped Wi-Fi signal | Very common | Video loads slowly, freezes, or shows “connecting” |
| Router or firewall blocking the camera | Common | Camera shows offline in the app |
| Corrupted or full SD card | Common | Live view works but playback doesn’t |
| Outdated firmware or app version | Occasional | Black screen, app crashes on connect |
| Power supply issue | Occasional | Camera won’t turn on at all |
| Lens or sensor fault | Rare | Green, purple, or blurry image |
Knowing which bucket your problem falls into saves you a lot of time. If the app says “offline,” that’s a network problem. If the app connects but the picture is black or green, that’s usually a hardware or lighting issue. Keep that distinction in mind as you go through the fixes below.
How Do I Check If My iCSee Camera Is Actually Online?
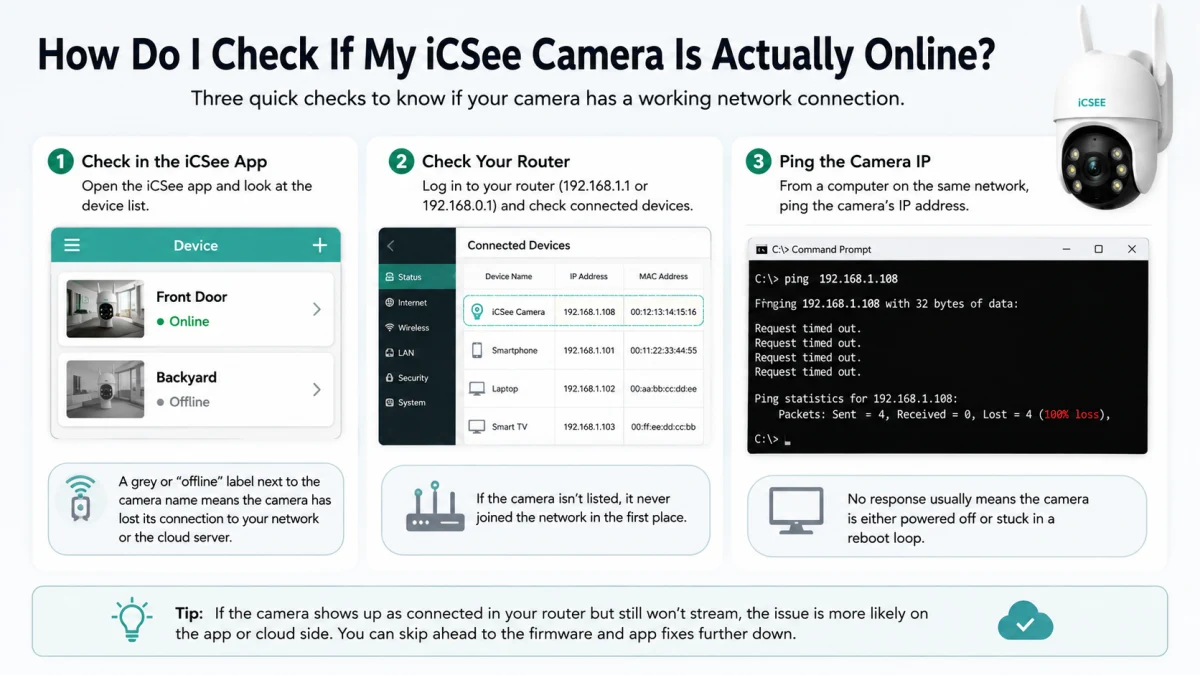
Before touching any settings, confirm whether the camera has a working network connection at all. This one check tells you whether you’re dealing with a connectivity problem or something else entirely. If you’re troubleshooting a camera you only just installed, it’s worth double-checking against a guide for setting up an iCSee camera for the first time, since a lot of “no video” cases trace back to a step that got skipped during setup.
- Open the iCSee app and look at the device list. A grey or “offline” label next to the camera name means the camera has lost its connection to your network or the cloud server.
- Check your router’s admin page (usually at 192.168.1.1 or 192.168.0.1) and look for the camera under connected devices. If it’s not listed, the camera never joined the network in the first place.
- Try pinging the camera’s IP address from a computer on the same network. No response usually means the camera is either powered off or stuck in a reboot loop.
If the camera shows up as connected in your router but still won’t stream, the issue is more likely on the app or cloud side, and you can skip ahead to the firmware and app fixes further down.
Fix 1: Restart the Camera and Router in the Right Order
This sounds too simple, but it resolves a surprising share of iCSee “no video” cases, because it clears out temporary glitches in both the camera’s memory and the router’s connection table.
- Unplug the camera from power. If it’s battery powered, remove the battery for 10 seconds.
- Unplug your router and modem too, and wait a full 30 seconds. Don’t rush this part; routers often need that time to fully clear their session tables.
- Plug the router back in first and wait for it to fully boot, usually 1-2 minutes.
- Plug the camera back in and give it another 1-2 minutes to reconnect.
- Reopen the iCSee app and check the live view.
If this works but the problem comes back within a day or two, that’s a sign of a deeper Wi-Fi signal issue rather than a one-off glitch, so move on to fix 2.
My iCSee Camera Keeps Disconnecting From Wi-Fi, What’s Going On?
When an iCSee camera shows video for a bit and then drops out repeatedly, weak or unstable Wi-Fi is almost always the culprit. Cameras need a steady signal to keep streaming, and even a strong-looking signal can be unreliable if there’s interference or distance involved.
A few things to check here:
- Signal strength: open your router app and look at the RSSI or signal bars for the camera. Anything weaker than -70 dBm is often too weak for stable video.
- Distance and obstacles: thick walls, metal doors, and mirrors all cut Wi-Fi range more than people expect. Moving the camera even a few feet closer to the router can make a real difference.
- Band conflicts: many budget cameras, including most iCSee models, only support 2.4GHz Wi-Fi. If your router broadcasts a combined 2.4/5GHz network under one name, the camera sometimes tries to connect to the 5GHz band and fails silently.
- Too many devices: if your router is juggling 20+ smart devices, cameras are often the first to get deprioritized during congestion.
If moving the camera isn’t practical, a Wi-Fi extender placed halfway between the router and camera usually fixes this. For cameras covering a detached garage or shed, a dedicated point-to-point wireless bridge is more reliable than stretching your main Wi-Fi signal that far.
Fix 2: Check Your Router’s Firewall and Port Settings
Routers with strict firewall rules or “AP isolation” enabled can quietly block a camera from reaching the internet, even though it’s technically connected to your Wi-Fi. This is a fix most troubleshooting guides skip, but it’s worth checking if the previous steps didn’t help.
- Log into your router’s admin panel and look for a setting called “AP Isolation,” “Client Isolation,” or “Guest Network Isolation.” Turn it off for the network your camera uses.
- Check whether UPnP is enabled. iCSee cameras generally rely on UPnP to open the ports they need automatically, so if it’s disabled, the camera may connect locally but fail to reach the cloud for remote viewing.
- If your router has a firewall or security suite (common on mesh systems like some Netgear or TP-Link models), temporarily lower the security level to “standard” and see if the camera reconnects.
Because this cause is so easy to overlook, it’s one of the more common reasons someone replaces a perfectly good camera thinking it’s broken, when really the router was quietly blocking it the whole time.
Fix 3: Update the Camera Firmware and the iCSee App
An outdated firmware version can cause exactly the kind of black-screen or freezing issues that look like a hardware failure but aren’t. iCSee pushes firmware updates that patch streaming bugs, so running old firmware is a common and often-missed cause of video loss.
- Open the iCSee app, go to your camera’s settings, and look for “Firmware Update” or “Device Info.”
- If an update is available, make sure the camera stays powered and connected during the entire update. Interrupting it can corrupt the firmware and make things worse.
- Separately, check your phone’s app store for iCSee app updates. App and firmware versions can fall out of sync, and that mismatch alone sometimes causes the live feed to fail even when the camera itself is working fine.
After updating, restart both the camera and the app before testing the live view again. If several family members use the same camera, it’s also worth confirming everyone is on a current app build, since one outdated viewer account can sometimes trigger odd sync errors when you share iCSee camera access with family members.
Fix 4: Fix an SD Card That’s Full, Corrupted, or Unformatted
If live view works but you get no video, black clips, or missing playback when scrubbing through recordings, the SD card is the likely cause, not the camera lens or the network.
Here’s how to sort out what’s actually wrong:
| Symptom | Likely Cause | Fix |
|---|---|---|
| Live view works, playback is blank | Card full or corrupted | Format card in-app, or replace it |
| Recordings stop after a few hours | Card write speed too slow | Use a Class 10 or higher microSD card |
| “No SD card” message despite card inserted | Card not seated properly, or unsupported size | Reseat card; check max supported capacity |
| Choppy or pixelated playback | Card nearing end of its write cycle lifespan | Replace with a new card |
A detail people often miss: most iCSee cameras cap out at 128GB or 256GB microSD cards depending on the model, and using an unsupported oversized card can cause the camera to fail to recognize storage at all, which then affects video buffering too. If you want to double-check what a card’s speed class rating actually means before buying a replacement, the SD Association’s speed class reference lays out the minimum sustained write speeds for each rating. Always format a new card inside the iCSee app rather than on a computer, since the app formats it with the file system the camera expects.
Fix 5: Reset the Camera to Factory Settings
When restarts and updates don’t help, a factory reset clears out any corrupted configuration data that’s been quietly causing the video failure. This is a good step before assuming the camera is dead. If you’re not sure exactly where the reset button is on your model, this walkthrough on the iCSee camera reset button covers the different placements across models.
- Find the small reset button, usually a pinhole near the power port or on the base of the camera.
- With the camera powered on, press and hold the reset button for about 10 seconds using a paperclip or SIM tool.
- Wait for the camera to reboot; you’ll usually hear a voice prompt or see the status light change pattern.
- Set the camera up again from scratch in the iCSee app, as if it were brand new.
Because a factory reset wipes your Wi-Fi credentials and custom settings, note down your motion detection zones and notification preferences beforehand if you can, so you’re not rebuilding everything from memory. If the camera is still tied to an old account after the reset and won’t let you re-add it, you’ll need to unbind the iCSee camera from that account first.
Fix 6: Rule Out a Power Delivery Problem
If the camera won’t even show a status light, this isn’t a video streaming issue at all, it’s a power problem, and no amount of app troubleshooting will fix it. This is worth separating from the software fixes above because people often waste time in the app when the real issue is at the outlet.
- Test the power adapter on a different outlet, ideally one you know works with another device.
- Check the cable itself for fraying or bends, especially on outdoor cameras where cables run through conduit or along exposed walls.
- For PoE (Power over Ethernet) cameras, confirm the switch or injector is actually delivering power; a bad Ethernet cable can carry data but fail to deliver sufficient power.
- For battery powered models, check the battery level in the app; a battery under 10% will sometimes let the camera connect briefly before dropping video entirely.
If the camera powers on with a different adapter or outlet, the original power supply was the problem, and it’s an easy, cheap replacement rather than a camera issue.
Does a Green or Purple Tint Mean My iCSee Camera Is Broken?
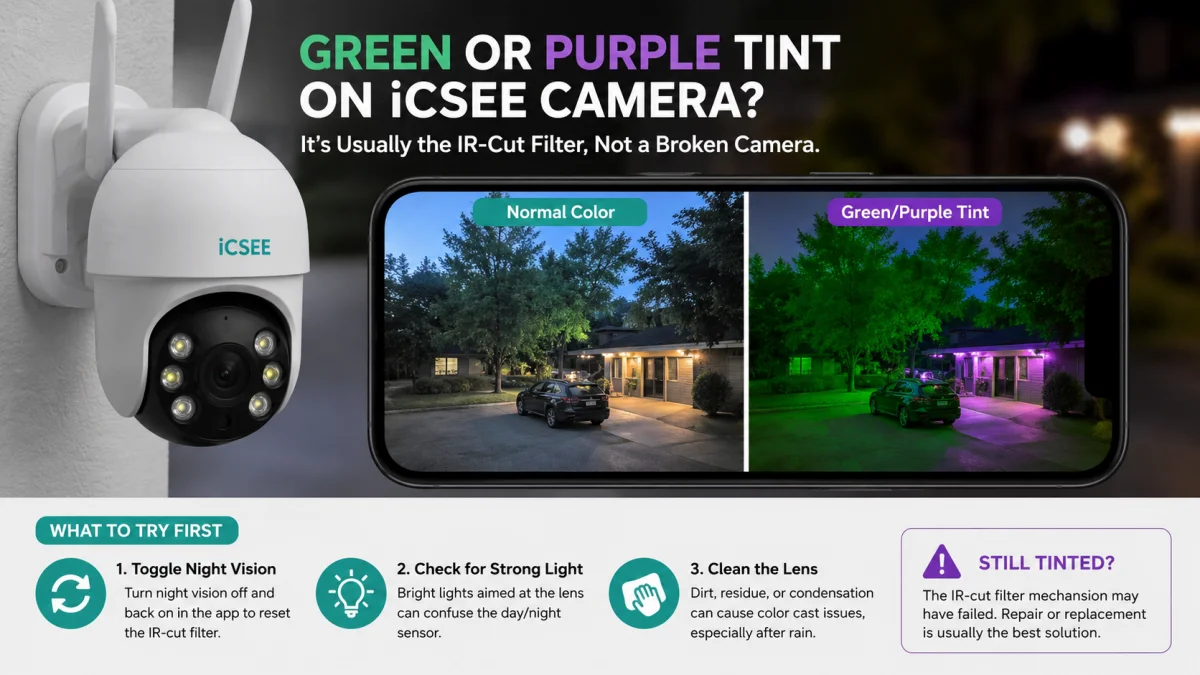
A green or purple tint over the video usually points to the IR-cut filter, not a broken camera. This filter switches the sensor between day and night mode, and when it gets stuck, colors shift dramatically even though the camera is still recording fine.
Try these before assuming you need a replacement:
- Toggle night vision off and back on manually in the app to force the IR-cut filter to re-engage.
- Check for a strong light source hitting the lens directly, like a porch light or headlights, which can confuse the day/night sensor.
- Clean the lens; residue or condensation can mimic a color cast, especially on outdoor cameras after rain.
If the tint persists after all of that, the IR-cut filter mechanism itself has likely failed mechanically, and at that point a repair or replacement is usually more practical than continuing to troubleshoot it.
When Should I Just Contact iCSee Support or Replace the Camera?
If you’ve worked through restarts, firmware updates, router settings, and a factory reset and the camera still shows no video, it’s time to get iCSee support involved rather than keep guessing. This especially applies if the camera is still under warranty, since a support ticket can often get you a replacement unit without extra cost.
Before contacting support, have this ready so the process moves faster:
- Camera model number, usually printed on the bottom or back of the unit.
- Current firmware version, found under device info in the app.
- A short description of exactly when the video loss happens, constant, intermittent, or only at night.
Cameras that are more than 2-3 years old and showing physical signs of wear, like a cracked housing or water intrusion on outdoor models, are usually better replaced than repaired, since the cost of diagnosis can end up close to the price of a new unit anyway. If you’re weighing whether to stick with the same ecosystem or switch brands entirely, it’s worth reading how iCSee camera compares to V380 Pro before you buy a replacement.
Frequently Asked Questions
Why does my iCSee camera show a black screen only at night?
This is almost always an IR (infrared) illumination problem rather than a network issue. Check that the IR LEDs around the lens are actually lighting up when it gets dark; if they’re not, night vision has failed even though daytime video works fine. Also make sure nothing, like a spider web or dust buildup, is physically blocking the IR sensor.
Can I still view recordings if my iCSee camera shows offline?
Yes, if the camera was recording to a local SD card before it went offline, those recordings are still saved on the card and you can view them once the camera reconnects, or by removing the card and reading it on a computer. Cloud recordings, on the other hand, stop being uploaded the moment the camera goes offline, so anything after that point won’t be available until connection is restored.
Does resetting my router affect my iCSee camera’s settings?
A router restart alone won’t touch your camera’s settings, but if your router assigns a new IP address to the camera afterward, the app may briefly show it as offline until it reconnects and picks up the new address. If you replace your router entirely or change your Wi-Fi password, you will need to reconnect the camera to the new network manually.
What happens if I use the wrong microSD card size in my iCSee camera?
Most iCSee models won’t recognize a card that exceeds their maximum supported capacity, and the app will typically show “no SD card” even though one is physically inserted. Using a card with a slow write speed, rather than wrong size, is actually the more common cause of choppy recordings, so a Class 10 or UHS-1 rated card is worth using even if size isn’t the issue.
Is it normal for my iCSee camera to lose video during a firmware update?
Yes, a brief loss of video during an update is expected since the camera reboots as part of the process. It typically comes back within 2-3 minutes. If video doesn’t return after 10 minutes or the camera won’t power back on, the update may have been interrupted, and you may need to do a manual factory reset to recover it.
Can weather affect my outdoor iCSee camera’s video feed?
Yes, heavy rain, fog, or extreme cold can all affect video quality and, in some cases, connectivity if the camera relies on Wi-Fi and the antenna gets waterlogged. Temperature swings can also cause condensation inside the housing on cheaper models, which shows up as a blurry or foggy image until it clears on its own once temperatures stabilize.