


You bought an NVR or DVR kit, plugged in the cables, and now you’re staring at the box wondering how a phone app is supposed to talk to it. Or maybe it’s the other way around: you already have a DVR or XVR recorder running on your wall, and you’re trying to add a separate iCSee camera into it. Both situations get lumped together in search results, but they’re two different jobs with two different menus, and mixing them up is the fastest way to waste twenty minutes tapping the wrong buttons.
By the end of this guide, you’ll know which setup applies to you, how to walk through it step by step, and how to fix the connection errors that show up most often, whether that’s a channel stuck on “no signal” or a DVR that just won’t find your camera on the network. We’ll also cover the two-network rule almost every failed setup traces back to.
Which iCSee + NVR/DVR Setup Do You Actually Have?
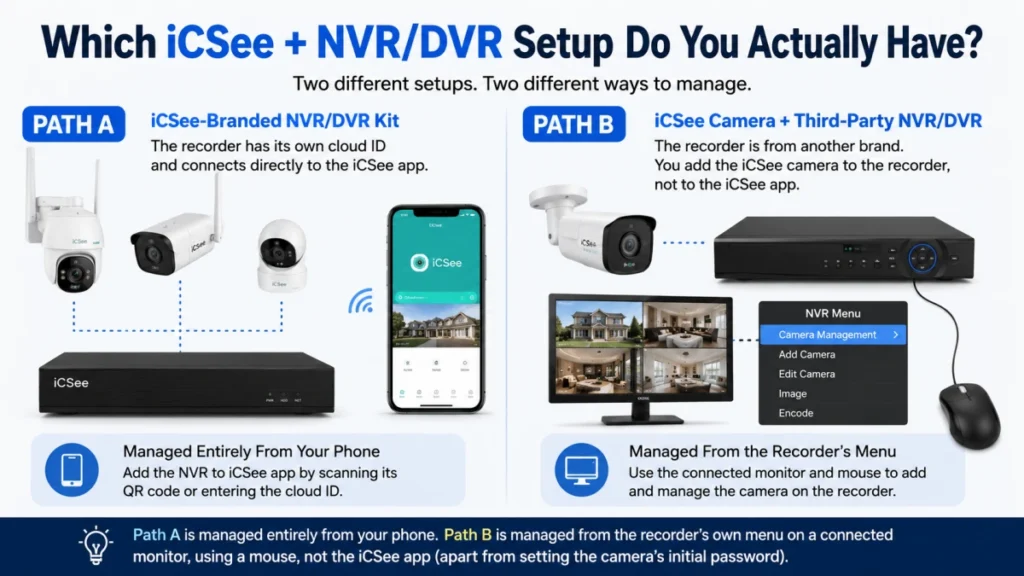
There are two separate ways iCSee shows up with an NVR or DVR, and figuring out which one you’re dealing with first saves a lot of backtracking:
- Path A – You bought an iCSee-branded NVR/DVR kit. The recorder itself has a cloud serial number and connects straight to the iCSee mobile app, the same way a single camera would.
- Path B – You have an iCSee camera and a separate, third-party DVR/XVR/NVR (Dahua, Hikvision-style, or a generic brand) already installed, and you want that recorder’s own on-screen menu to pick up the camera as one of its channels.
Path A is managed entirely from your phone. Path B is managed from the recorder’s own menu on a connected monitor, using a mouse, not the iCSee app at all, apart from setting the camera’s initial password. Here’s how each one works.
Path A: Adding an iCSee NVR or DVR Kit to the App
An NVR (network video recorder) or DVR (digital video recorder) connects to several cameras at once and stores footage on an internal hard drive, and when the recorder itself is iCSee-compatible, the app treats it as one device with multiple channels. Adding it takes five steps:
- Connect the NVR or DVR to your router with an ethernet cable and power it on, giving it a minute or two to fully boot.
- Open iCSee, log in, and tap the plus icon to start adding a device.
- Choose the option for adding by serial number or QR code, not “WiFi Camera,” since a recorder connects over LAN or cloud, not directly to your phone’s WiFi.
- Scan the QR code on the recorder’s sticker or its onscreen Network/Info menu, or type the serial number manually if the sticker is worn.
- Enter the device password (often printed near the serial number, or blank on first boot) and give the device a name.
If you’ve never worked through the app’s onboarding screens before, our walkthrough on setting up an iCSee camera for the first time covers the account creation steps this guide assumes are already done.
Cloud ID or LAN Mode: Which Should You Use?
Cloud ID mode routes your connection through iCSee’s remote servers, while LAN mode connects your phone straight to the recorder over local WiFi, and picking the right one matters more for a multi-channel recorder than a single camera, since a recorder is pushing several video streams at once and cloud relaying adds noticeable lag on four or more channels.
| Mode | Best for | Typical experience |
|---|---|---|
| Cloud ID (P2P) | Viewing from outside your home network | Reliable but can lag on multi-channel view, especially over mobile data |
| LAN / Local login | Viewing on the same WiFi as the recorder | Near-instant, full resolution, no internet dependency |
A practical habit: use LAN mode at home and switch to Cloud ID only when you’re actually away, toggling the login type from the device’s edit screen rather than re-adding it. If you rely on remote viewing a lot, streaming four synced channels can burn through 1-2 GB of mobile data per hour, so switch a channel to sub-stream when you’re off WiFi.
Playback, Exports, and Missing Channels
Playback pulls footage straight off the recorder’s hard drive, so you need an active connection (local or remote) to scrub through past recordings. From live view, tap the playback icon, pick a date, and you’ll see a timeline with color-coded blocks for continuous versus motion-triggered recording. To save a clip, use the download or scissors icon while it’s playing, which trims and exports an MP4 to your phone. Export speed depends on your connection: a 10-minute clip over Cloud ID on cellular can take several minutes, while the same clip over LAN usually finishes in seconds.
If you’re only seeing one channel instead of all your cameras, it almost always means the app hasn’t pulled the full channel list yet, or a channel has no camera assigned on the recorder side. Removing the device from iCSee and re-adding it with the same serial number forces a fresh channel scan and usually fixes the grid.
Path B: Adding an iCSee Camera to a Third-Party DVR, XVR, or NVR
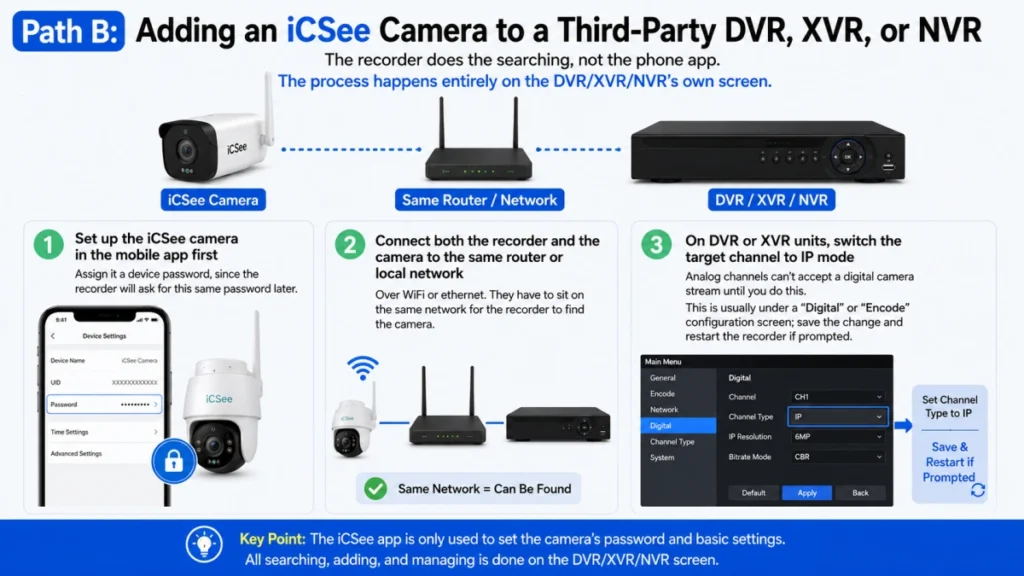
This is the setup people usually mean when they ask about connecting an iCSee camera to “an NVR system” that isn’t itself an iCSee product. Here, the recorder does the searching, not the phone app, so the process happens entirely on the DVR/XVR’s own screen.
Prerequisites
- Set up the iCSee camera in the mobile app first and assign it a device password, since the recorder will ask for this same password later.
- Connect both the recorder and the camera to the same router or local network, over WiFi or Ethernet. They have to sit on the same network for the recorder to find the camera at all.
- On DVR or XVR units specifically, open the system menu and switch the target channel to IP mode, since analog channels can’t accept a digital camera stream until you do this. This is usually under a “Digital” or “Encode” configuration screen; save the change and restart the recorder if prompted.
Step-by-Step: Adding the Camera on the Recorder
| Step | What to do |
|---|---|
| 1. Open the menu | Right-click on the monitor connected to the recorder to open the main menu, then go to Camera or Channel Management. |
| 2. Search for devices | Click the plus sign on an empty channel, or select IP Search, to scan the local network for active IP cameras. |
| 3. Select your camera | Find your iCSee camera’s IP address in the results list. |
| 4. Enter credentials | Select the camera and enter the username and the device password you created in the iCSee app during setup. |
| 5. Apply and save | Click Add or Apply. A green online icon appears, and the live feed shows up on that channel. |
If the camera doesn’t connect on the first try, switch the protocol dropdown to ONVIF instead of the recorder’s proprietary default, since ONVIF is a shared standard most iCSee cameras also speak and it sometimes succeeds where the default protocol fails. If you’re prompted for a password and don’t remember setting one, try leaving it blank or using the default first, then update it manually once the camera is online, since some recorders default to a blank password on first discovery.
Troubleshooting Path B Connections
Most failures here come down to one of three things. First, the camera and recorder aren’t actually on the same network segment, which the IP Search step will confirm by simply not listing the camera at all. Second, the DVR/XVR channel is still set to analog rather than IP mode, so double back to that system setting if the plus-sign search comes up empty on a channel you know has a camera wired or WiFi-connected nearby. Third, the credentials don’t match: if you’ve forgotten the camera’s password, open the iCSee app and check the device’s settings, or perform a factory reset on the camera to generate new default credentials and start again.
For anyone mixing iCSee cameras into a mixed-brand recorder, it’s worth confirming your recorder’s ONVIF settings first, since compatibility depends on how closely the recorder follows the ONVIF standard for cross-brand device discovery, and this is exactly the setting that resolves most Path B failures.
Is iCSee the Same App as XMEye?
iCSee and XMEye are two different apps from the same manufacturer, Xiongmai, and a lot of older or budget DVRs still ship with XMEye branding even though iCSee now works with the same hardware. XMEye is the older, more technical interface aimed at installers; iCSee is the simplified consumer version with the same underlying cloud connection. A serial number that works in XMEye also works in iCSee, so if your recorder’s manual only mentions XMEye, don’t assume iCSee won’t connect. For a closer look at how iCSee’s own app tiers differ, see our iCSee vs iCSee Pro comparison.
What If the Recorder Still Won’t Connect?
A handful of symptoms cover almost every remaining case, whether you’re on Path A or Path B.
| Symptom | Likely cause | Fix |
|---|---|---|
| Device shows “offline” right after adding | Recorder isn’t fully booted, or cable/WiFi is loose | Wait two minutes after power-on, reseat cables, check for a link light on the router port |
| “Serial number not found” (Path A) | Typo in manual entry, or recorder hasn’t reached the internet yet | Rescan the QR code instead of typing manually, confirm the recorder’s network menu shows an internet connection |
| Camera doesn’t show in IP Search (Path B) | Camera and recorder are on different networks, or the channel is still in analog mode | Confirm both are on the same router, and switch the channel to IP mode in system settings |
| Password rejected repeatedly | Password was changed on-site or reset previously | Check current credentials in the iCSee app, or factory reset the camera or recorder if truly unknown |
If a device keeps bouncing back to offline no matter what you try, our guide on what to do when a device keeps showing offline covers network-side fixes for both cameras and recorders. And if you’ve lost a password entirely, the steps in our factory reset guide apply to most iCSee cameras and recorders, though the physical reset button location varies by model. For anyone managing a lot of channels day to day, our guide on how to install iCSee on a Windows or Mac computer is also worth a look, since a bigger screen makes multi-camera grids and playback review noticeably easier than doing it all on a phone.
Frequently Asked Questions
Can I add an iCSee camera to a DVR without an internet connection?
Yes, as long as both the camera and the DVR are on the same local network. Path B setup happens entirely over the local network through the recorder’s own search feature, so no internet is required for that connection, though the camera itself needed internet once during its initial iCSee app setup.
Does my recorder need ONVIF support to add an iCSee camera?
Not always, but it helps. Many DVR/XVR units can detect iCSee cameras with their own proprietary discovery tool, but switching the protocol dropdown to ONVIF during setup is the most reliable fallback when the default discovery method fails to connect or keeps rejecting the password.
What username should I use when adding an iCSee camera to a DVR?
Most iCSee cameras use “admin” as the default username, paired with the device password you created inside the iCSee app during initial setup. If that combination is rejected, check the camera’s settings in the app to confirm the exact credentials before trying again.
Why does my NVR show more channels than the cameras I actually have connected?
This usually means the recorder has more channels than cameras physically wired or added to it, which is normal for kits sold as “8-channel” but shipped with only 4 cameras. Unused channels just show a “no signal” tile until you connect additional cameras.
Can I set motion alerts for individual channels on an NVR?
Yes. Open the device in iCSee, go into that specific channel’s settings rather than a device-wide menu, and enable motion alerts there, so you can, for example, get notified for a driveway camera but skip alerts for an indoor channel that catches pets or ceiling fans.
Does the recorder keep recording if my phone disconnects from iCSee?
Yes. Recording happens locally on the recorder’s hard drive regardless of whether the app is open or connected. iCSee is only a viewer and remote control layer, so closing the app never stops or interrupts the recorder’s own recording schedule.